a first look at slinkity
slinkity11tyvitereactSlinkity is a framework that uses Vite to bring dynamic, client side interactions to your static 11ty sites. It was announced by Ben Holmes with a Tweet on June 14, 2021 and released as an alpha version on August 8, 2021. It enables turning existing .html or .liquid files into .jsx files.
Slinkity allows you to insert components into pages with shortcodes such as, {% react './path/to/Hello.jsx' %}. Because component-driven pages are hydrated on the client, dynamic state management works in both development and production. It aims to unify two competing camps in the current web development community:
- Lean, JavaScript-free static site generators driven by data and templating languages like Jekyll and Hugo.
- Dynamic, JavaScript-heavy web apps powered by data and React or Vue components like NextJS and NuxtJS.
Slinkity is in early alpha and not recommended for production use. You can report issues or log bugs here. You can find the example code for this project on my GitHub.
1. Create Project #
Start by making a new directory with an index.md file containing a header and a .gitignore file.
mkdir -p ajcwebdev-slinkity/src
cd ajcwebdev-slinkity
echo '# ajcwebdev-slinkity' > src/index.md
echo 'node_modules\n_site\n.DS_Store' > .gitignore
Add Slinkity dependency #
Initialize a package.json file and install Slinkity as a development dependency. You will also need to install react and react-dom as dependencies.
yarn init -y
yarn add -D slinkity @11ty/eleventy@beta
yarn add react react-dom
Slinkity relies on 11ty's latest 1.0 beta build to work properly.
.eleventy.js #
Create an 11ty configuration file.
touch .eleventy.jsSet the input directory to src.
// .eleventy.js

module.exports = function (eleventyConfig) {
  return {
    dir: {
      input: 'src',
    },
  }
}
Start development server #
npx slinkity --serve starts a Vite server pointed at your 11ty build.
npx slinkity --serveThe --incremental flag can be used for faster builds during development. Vite enables processing a range of file types including SASS and React.
[Browsersync] Access URLs:
 -----------------------------------
    Local: http://localhost:8080
 External: http://192.168.1.242:8080
 -----------------------------------
[Browsersync] Serving files from: _site

[11ty] Writing _site/index.html from ./src/index.md (liquid)
[11ty] Copied 1 file / Wrote 1 file in 0.11 seconds (v1.0.0-beta.2)
[11ty] Watching…
Open localhost:8080 to view your site.

When using the slinkity command, all arguments are passed directly to the eleventy CLI except serve and port:
servestarts the 11ty dev server in--watchmode to listen for file changes.- Slinkity spins up an independent Vite server instead of 11ty's Browsersync server.
portis for our own server which needs to be picked up and passed to Vite.
The CLI checks for Eleventy configs and will look for any custom directories returned such as input or output. If found, those are passed off to the Vite server so it can look in the right place.
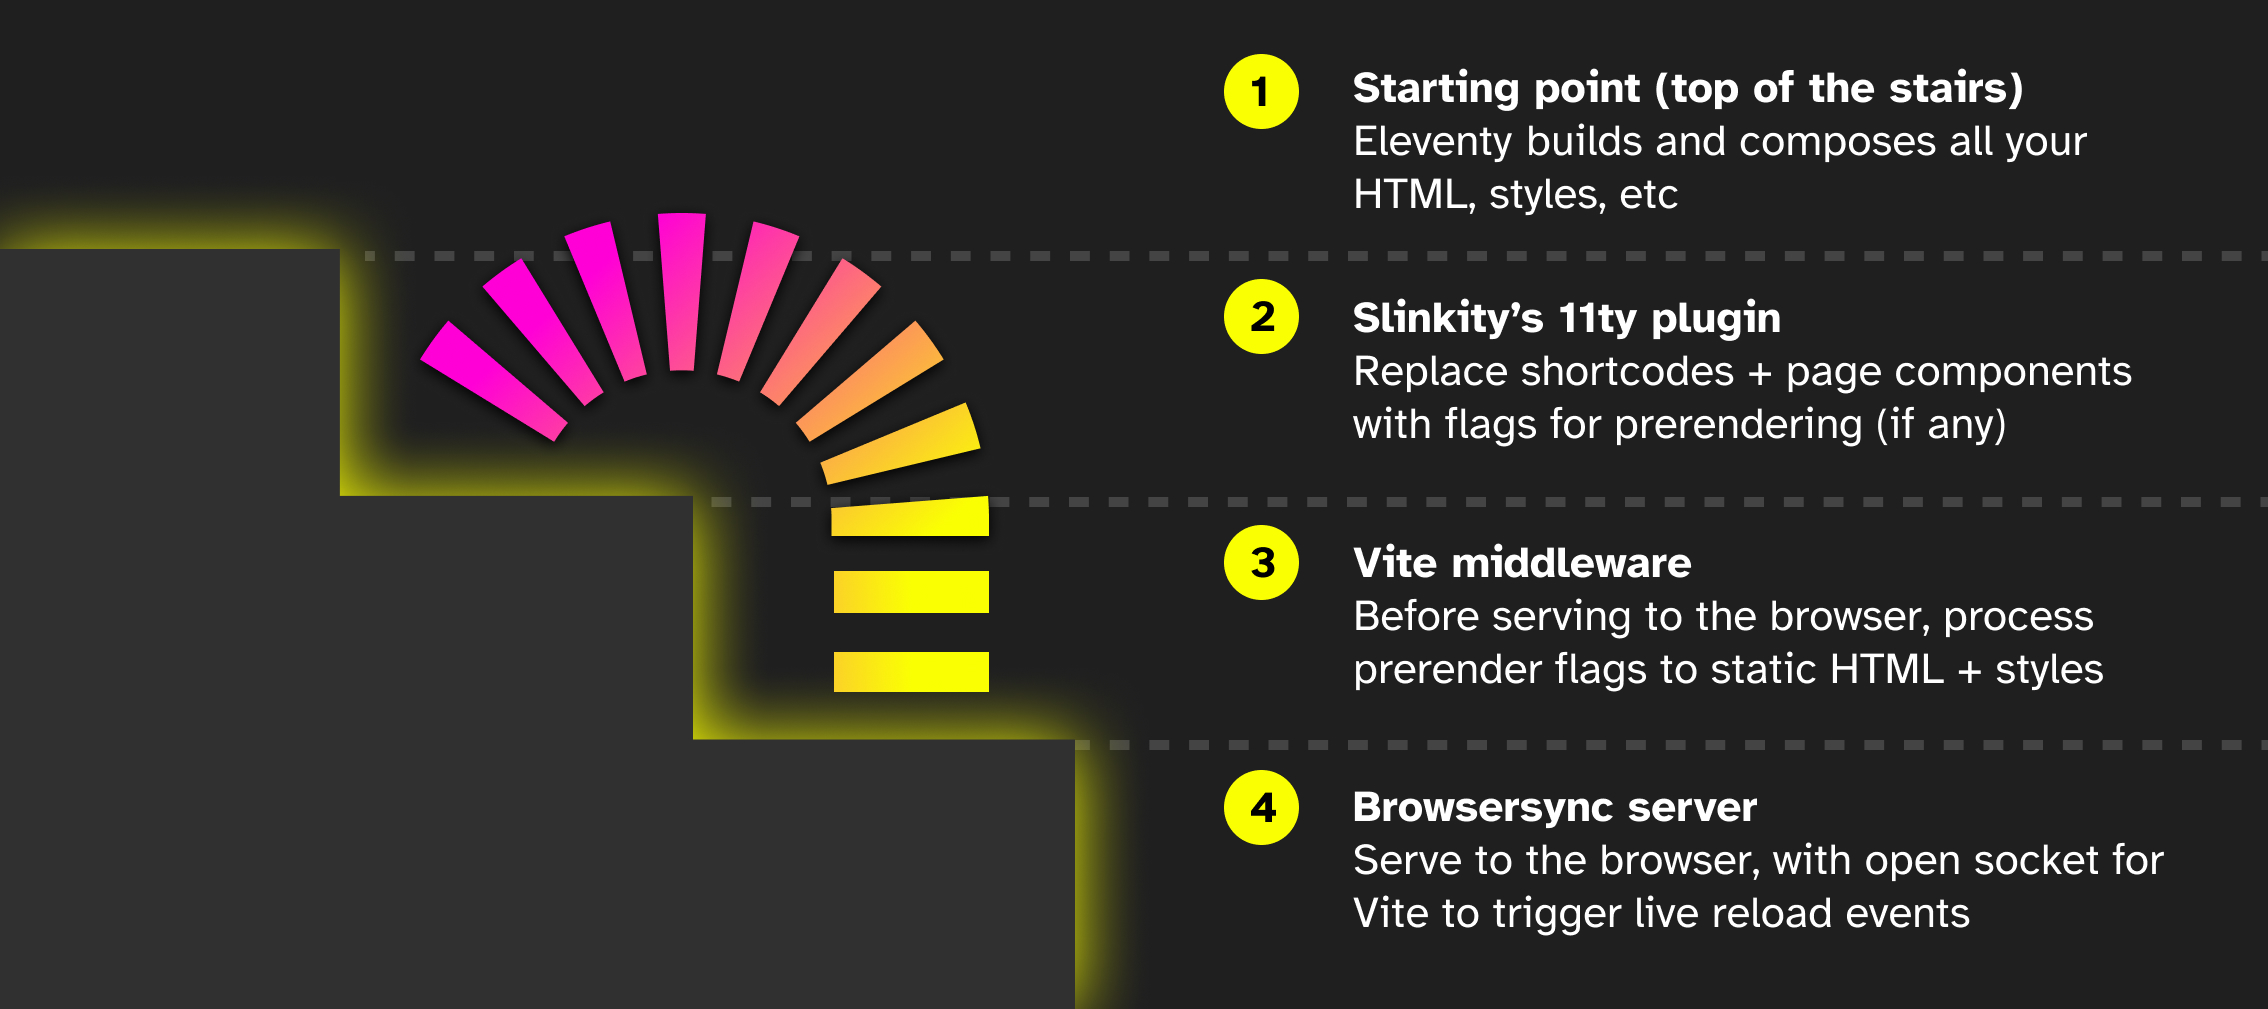
We start 2 dev servers in parallel:
- An Eleventy server to build your templates and watch for file changes
- A Vite server for resource bundling and debugging in your browser
The Vite server starts by pointing to your Eleventy output directory. If that directory doesn't exist yet, Vite waits for the directory to get written.
2. Add React Components #
We have our 11ty project up and running. We will now create a jsx component and include it on our index page with a shortcode.
Hello.jsx #
Your components will be included in a directory called components inside 11ty's _includes directory.
mkdir -p src/_includes/components
touch src/_includes/components/Hello.jsx
This is where all your imported components should live. Slinkity will always copy the contents of _includes/components/ to the build for Vite to pick up. If you place your components anywhere outside of here, Vite won't be able to find them!
// src/_includes/components/Hello.jsx

import React from "react"

const Hello = () => {
  return (
    <>
      <span>The quality or condition of a slinky</span>
    </>
  )
}

export default Hello
This component returns some text contained in span tags. With the react shortcode, you can insert components into any static template that 11ty supports. Include react shortcode in index.md and pass the path to your component, in this case components/Hello.
# ajcwebdev-slinkity

{% react 'components/Hello' %}
_includes and .jsx are optional in our shortcode.

Counter.jsx #
Like the previous component, the file must be under _includes/components so Slinkity can copy this directory over to your build.
touch src/_includes/components/Counter.jsxDeclare a new state variable called count.
// src/_includes/components/Counter.jsx

import React, { useState } from 'react'

function Counter() {
  const [count, setCount] = useState(0)

  return (
    <div>
      <p>You've had {count} glasses of water 💧</p>

      <button onClick={() => setCount(count + 1)}>
        Add one
      </button>
    </div>
  )
}

export default Counter
Include the component with a shortcode like the previous one.
# ajcwebdev-slinkity

{% react 'components/Hello' %}

{% react 'components/Counter' %}
This will find _includes/component/Counter.jsx, statically render the component, insert it as HTML, and hydrate the HTML rendered with our JavaScript component.

3. Create a component page #
Component pages are like any other template on your 11ty site. Templates are the files that define your contents. In a blog, for instance, this could be the Markdown file that contains your blogpost.
about.jsx #
Say we wanted to create an /about page with an interactive image carousel. We can create an about.jsx file alongside the other pages on our site.
touch src/about.jsxYou will receive an error message that about.jsx doesn't export anything. Add the following:
// src/about.jsx

import React from 'react'

function About() {
  return (
    <h2>This page tells you stuff about things!</h2>
  )
}

export default About
Open /about/ to see the page. You will need to include that trailing slash / for our Vite server to find the page. This is because our JS bundle lives on /about, which trips up the Vite development server.

4. Layouts #
Slinkity is wrapping our component with some html and body tags automatically. However, if we have metadata or extra wrapper elements to include, it is useful to create a layout template. You can learn more about layout chaining here.
Applying front matter #
If you're familiar with 11ty, you've likely worked with front matter before. Front matter works the same way for component-based pages as it does for 11ty. You can think of front matter as a way to pass information "upstream" for other templates to read from.
// src/about.jsx

import React from 'react'

export const frontMatter = {
  title: 'About me'
}

function About() {
  return (
    <h2>This page tells you stuff about things!</h2>
  )
}

export default About
This title key is now accessible from any layout templates applied to our page. See 11ty's front matter documentation for more on how the data cascade fits into this.
layout.html #
Create a layout.html under _includes directory
touch src/_includes/layout.htmlPopulate layout.html with content.
<!-- src/_includes/layout.html -->

<!DOCTYPE html>
<html lang="en">
  <head>
    <meta charset="UTF-8">
    <meta http-equiv="X-UA-Compatible" content="IE=edge">
    <meta name="viewport" content="width=device-width, initial-scale=1.0">

    <title>a first look at slinkity</title>
  </head>

  <body>

  </body>
</html>
a first look at slinkityuses the "title" attribute from our page's front matter- `` renders our component page
Include frontMatter in about.jsx to wire up the layout.
// src/about.jsx

import React from 'react'

export const frontMatter = {
  title: 'About me',
  layout: 'layout.html',
}

function About() {
  return (
    <h2>This page tells you stuff about things!</h2>
  )
}

export default About
5. Deploy your site to Netlify #
Slinkity projects can be hosted on any of the common Jamstack hosting providers such as Netlify and Vercel.
netlify.toml #
Create a netlify.toml file.
touch netlify.tomlInclude npx slinkity for the build command and _site for the publish directory.
[build]
  command = "npx slinkity"
  publish = "_site"
npx slinkity #
Running npx slinkity creates a production build. Your new site will appear in the _site folder or wherever you tell 11ty to build your site. For production builds, Eleventy first builds all your routes to a temporary directory and then Vite picks up all the resource bundling, minification, and final optimizations to build your intended output from this temporary directory.
Create Github Repo #
If you have the GitHub CLI installed, you can use the following commands to initialize your project and push it to GitHub.
git init
git add .
git commit -m "a slinky is a precompressed helical spring toy"
gh repo create ajcwebdev-slinkity
git push -u origin main
Alternative, you can create a blank GitHub repository at repo.new and add the remote before pushing.
Connect your repo to Netlify #
You can also create a custom domain name.
